For a long long time, I’ve wanted to build an arcade machine of my own. I researched doing it about 17 years ago, but the cost and the time weren’t something that I had (and I guess I still don’t).
Since about 1998, I’ve been using the MAME (Multiple Arcade Machine Emulator) program to run ROMs (video games) of all of my favorite games from the 80s and 90s. So the really really tricky part of building the program to run the games has already been done.
But what about the computer to run the games on?
Advancements in technology have made it much much easier to build a low cost, high functioning arcade machine. The main issue that I kept running into was needing to build a mega computer with a large computer monitor to actually play the games on. 20 years ago, that would have been extremely expensive. But now that we have credit card sized computers, such as the Raspberry Pi, the cost is significantly lower.
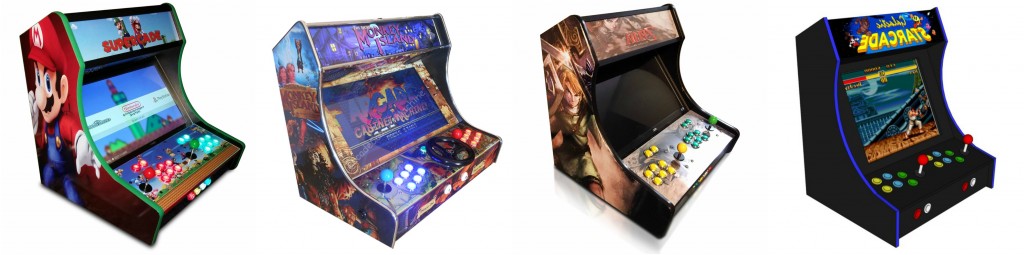
There are dozens and dozens of plans for bartop arcade cabinets online, but none of them were exactly what I wanted. So I decided to make my own design from a combination of different designs I found. One problem that I discovered is that all of the bartop arcade machines that were built for two players were actually very crowded and having two grown adults playing at the same time would basically have them touching shoulders with no room to move at all. So I knew I would have to make mine much wider than any other designs.
First, here is a video of my finished cabinet:
So….let’s get right to it.
Parts/Tools List
- Raspberry Pi 3
- MDF Board – Both 3/4 inch and 1/2 inch (get a few in case you mess up)
- A monitor – In this case, I went with this Sceptre 27″ Monitor
- Micro SD Card – This depends on the image that you use and how many roms you want to load. I’m using a 128 GB card. We’ll get to the images and roms later.
- Arcade buttons and joysticks – There are many to choose from. I went with these packages with 2 player joysticks, and another single player joystick since I planned on having 2 players, and an analog controller for analog games. The all come with buttons too!
- Speakers – These Amazon speakers are great and easy to take apart.
- Power Strip – I love this power strip (ISELECTOR 4-Outlet Surge Protector with 4 USB Output Power Strip Charging Station) because it’s got USB plugs in it as well. Not everything needs to be plugged into the Pi, so I went with this option and it’s been great.
- A router
- This router cutter for the T Molding – Whiteside 6700A Slotting Cutter 1-7/8CD 1/16CL 5/16Bore 3Wing
- This router bit for the cutter – Whiteside Router Bits A200B Slotting Cutter
- Screws. Get an assortment 1 inch, half inch, small, long. You never know what you’ll need for this.
- Drill
- Jigsaw
- Circular saw or Skil Saw
- URBEST Inlet Module Plug 5A Fuse Switch UR and CE Certification Male Power Socket 10A 250V 3 Pin IEC320 C14
- USB & 3.5mm Dash Flush Mount Cable
- 3ft HDMI Cable
- Player 1 and Player 2 buttons – I bought these and they work well.
- USB Hub – Here is a list of USB hubs that work with a Raspberry Pi. I’d suggest looking at it because I learned the hard way that not all hubs work. Don’t buy a USB 3.0 hub. Make sure it’s powered.
- Marquee Light – I got this one and it’s very bright and works great.
- T-molding – There are all kinds of colors here
- 2 Spade Drill bits (if you use the buttons I used): 3/4 Inch bit and 1 1/8 Inch bit. This is to drill the button holes.
- A dust mask
- Eye goggles. Seriously. Get these and the dust mask. MDF board puts a lot of particles in the air when you cut and some of it is extremely bad for you. Plus it will irritate your eyes and lungs.
If you do my type of control panel, you’ll need all of these additional parts:
- Trackball
- Trackball LED – The LED module comes with this trackball.
- Spinner
- 25 Cent buttons with lights – Bought these and they are great!
- 6 additional arcade buttons – There are all kinds here
- LED Wiz (to light up the trackball LED)
I ordered my graphics from this place and they are amazing, sharp and vivid.
Prepping the Raspberry Pi
Raspberry Pi’s are really neat little things. You can do so many things with them. I’m running a development server with 4 of them, and I run a Plex server with another one that host thousands of movies online so I can watch them from anywhere.
We’ll be using RetroPie, a retro gaming emulation operating system specifically for Raspberry Pi, to transform the Pi into your central computer for the cabinet. Not only does RetroPie play arcade games, but it also plays NES, Super NES, SEGA, and a bunch of other systems. It’s pretty incredible.
Depending on the size of your micro SD card, you’ll want to hunt down a RetroPie image. There are tons listed here: http://www.arcadepunks.com/retro-pi-downloads-page/
I’m not a fan of downloading things through online downloading companies like MegaDownloads. Most of them will charge you for large downloads or at least want you to sign up for an account to access anything. So I prefer to use the torrent links. I’ve set my Pi up to use Rey’s Image. Here is a magnet link to the sd card image. It will likely take 5-8 hours to download the .img file because they are huge. There are lots of different RetroPie images online if you just search for them. I’ve tried a handful and Rey’s Image is by far the most solid build and is almost problem free.
Once you download the .img file, you’ll need to transfer the img on to the SD card. I’d highly recommend either the Apple Pi Baker or Etcher to transfer your .img file to the sd card.
After you transfer the image to your SD card, you should be able to put in the Raspberry Pi and fire it up. For some folks, that may be enough. You could easily just hook that up to any TV and attach your controllers to your Pi and be done with it. But for us, we’re building an arcade cabinet and doing things the hard way. 🙂
Blueprints
As I mentioned before, I wasn’t able to find the exact blueprints that I wanted, so I elongated parts of various blueprints and created my own layouts for the cabinet.
Here are some blueprints that you can print off and cut from. You’ll likely have to print these off and tape them together unless you have a large format printer:
My cabinet has a deeper marquee area by just an inch or so, and the control panel area is deeper by about 10 inches to accommodate the trackball, spinner and the extra joystick. It’s also much much wider than most bartop arcade cabinets you’ll find online.
Update
I get a lot of email about my side panels and measurements, so I’ve finally gotten around to creating these. They aren’t to scale but they are pretty close. Most of the measurements are pretty accurate, but it’s hard to get absolute measurements because of the curves on the corners.
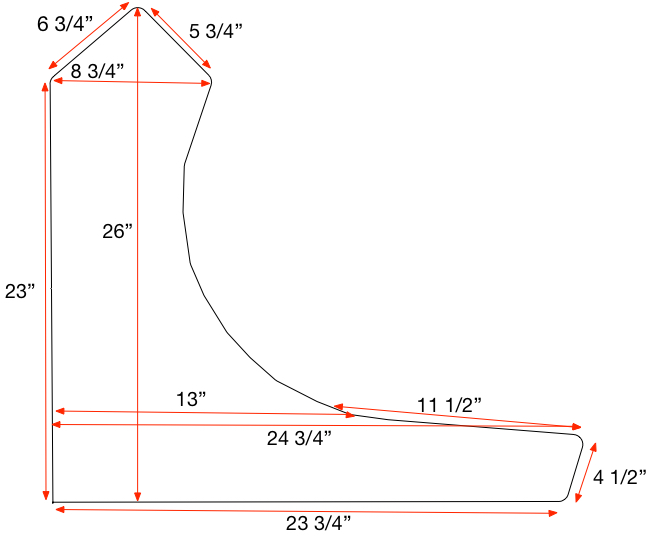
Here is a PDF of the plans.
I did not include the curve radius on the front part of the side panel because I totally freehanded this. Basically what I did was cut all part of the side panel except for that curve. I trimmed it so it was pretty close to what I wanted and then sketched the curve. Then I cut it with a jigsaw and used a file to make it smooth and even.
The control panel blueprints are a completely different issue. That depends on a lot of things. Do you want MAME control buttons? Do you want coin buttons, or player start buttons, or both? Do you want a full 8 button control panel or just 3-4 buttons? Trackball? Spinner?
One of the first thing I would research is the number of buttons your favorite systems use. In the end I opted for 8 buttons. I’d rather have too many, than too few and not be able to play a certain game. Plus…and I just realized this, the more buttons you have, the more you can program to do different things, and the less you have to depend on a keyboard. Check this page out for all of the different system button layouts.
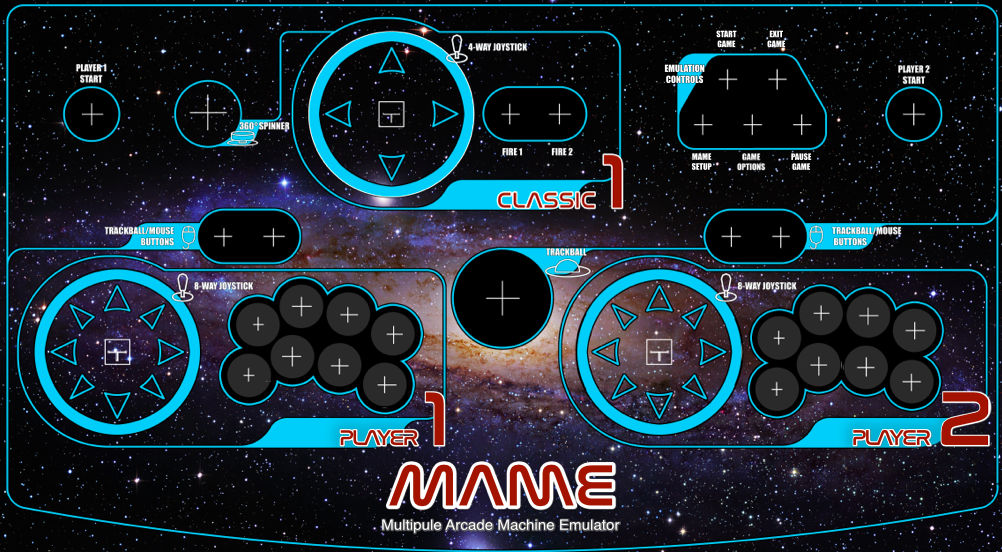
If you want the exact Photoshop PSD control panel file I made, here it is. It’s huge (over 200M) and you’ll need the NASA fonts. I designed this entire thing myself, and after all this time, I just realized that I misspelled multiple (multipule). I’ll post the marquee design later.
Before you cut MDF board…
Before you start cutting MDF board, it would really be helpful to make a full scale model to help you get all of your measurements. Make it out of cardboard so that you can draw on it and cut it easily. You’ll want to also print out your templates for the control panel. I setup all of my buttons and played a few games just to see if I like the layouts. I ended up changing the button layout 3 times until I found the one that I liked.
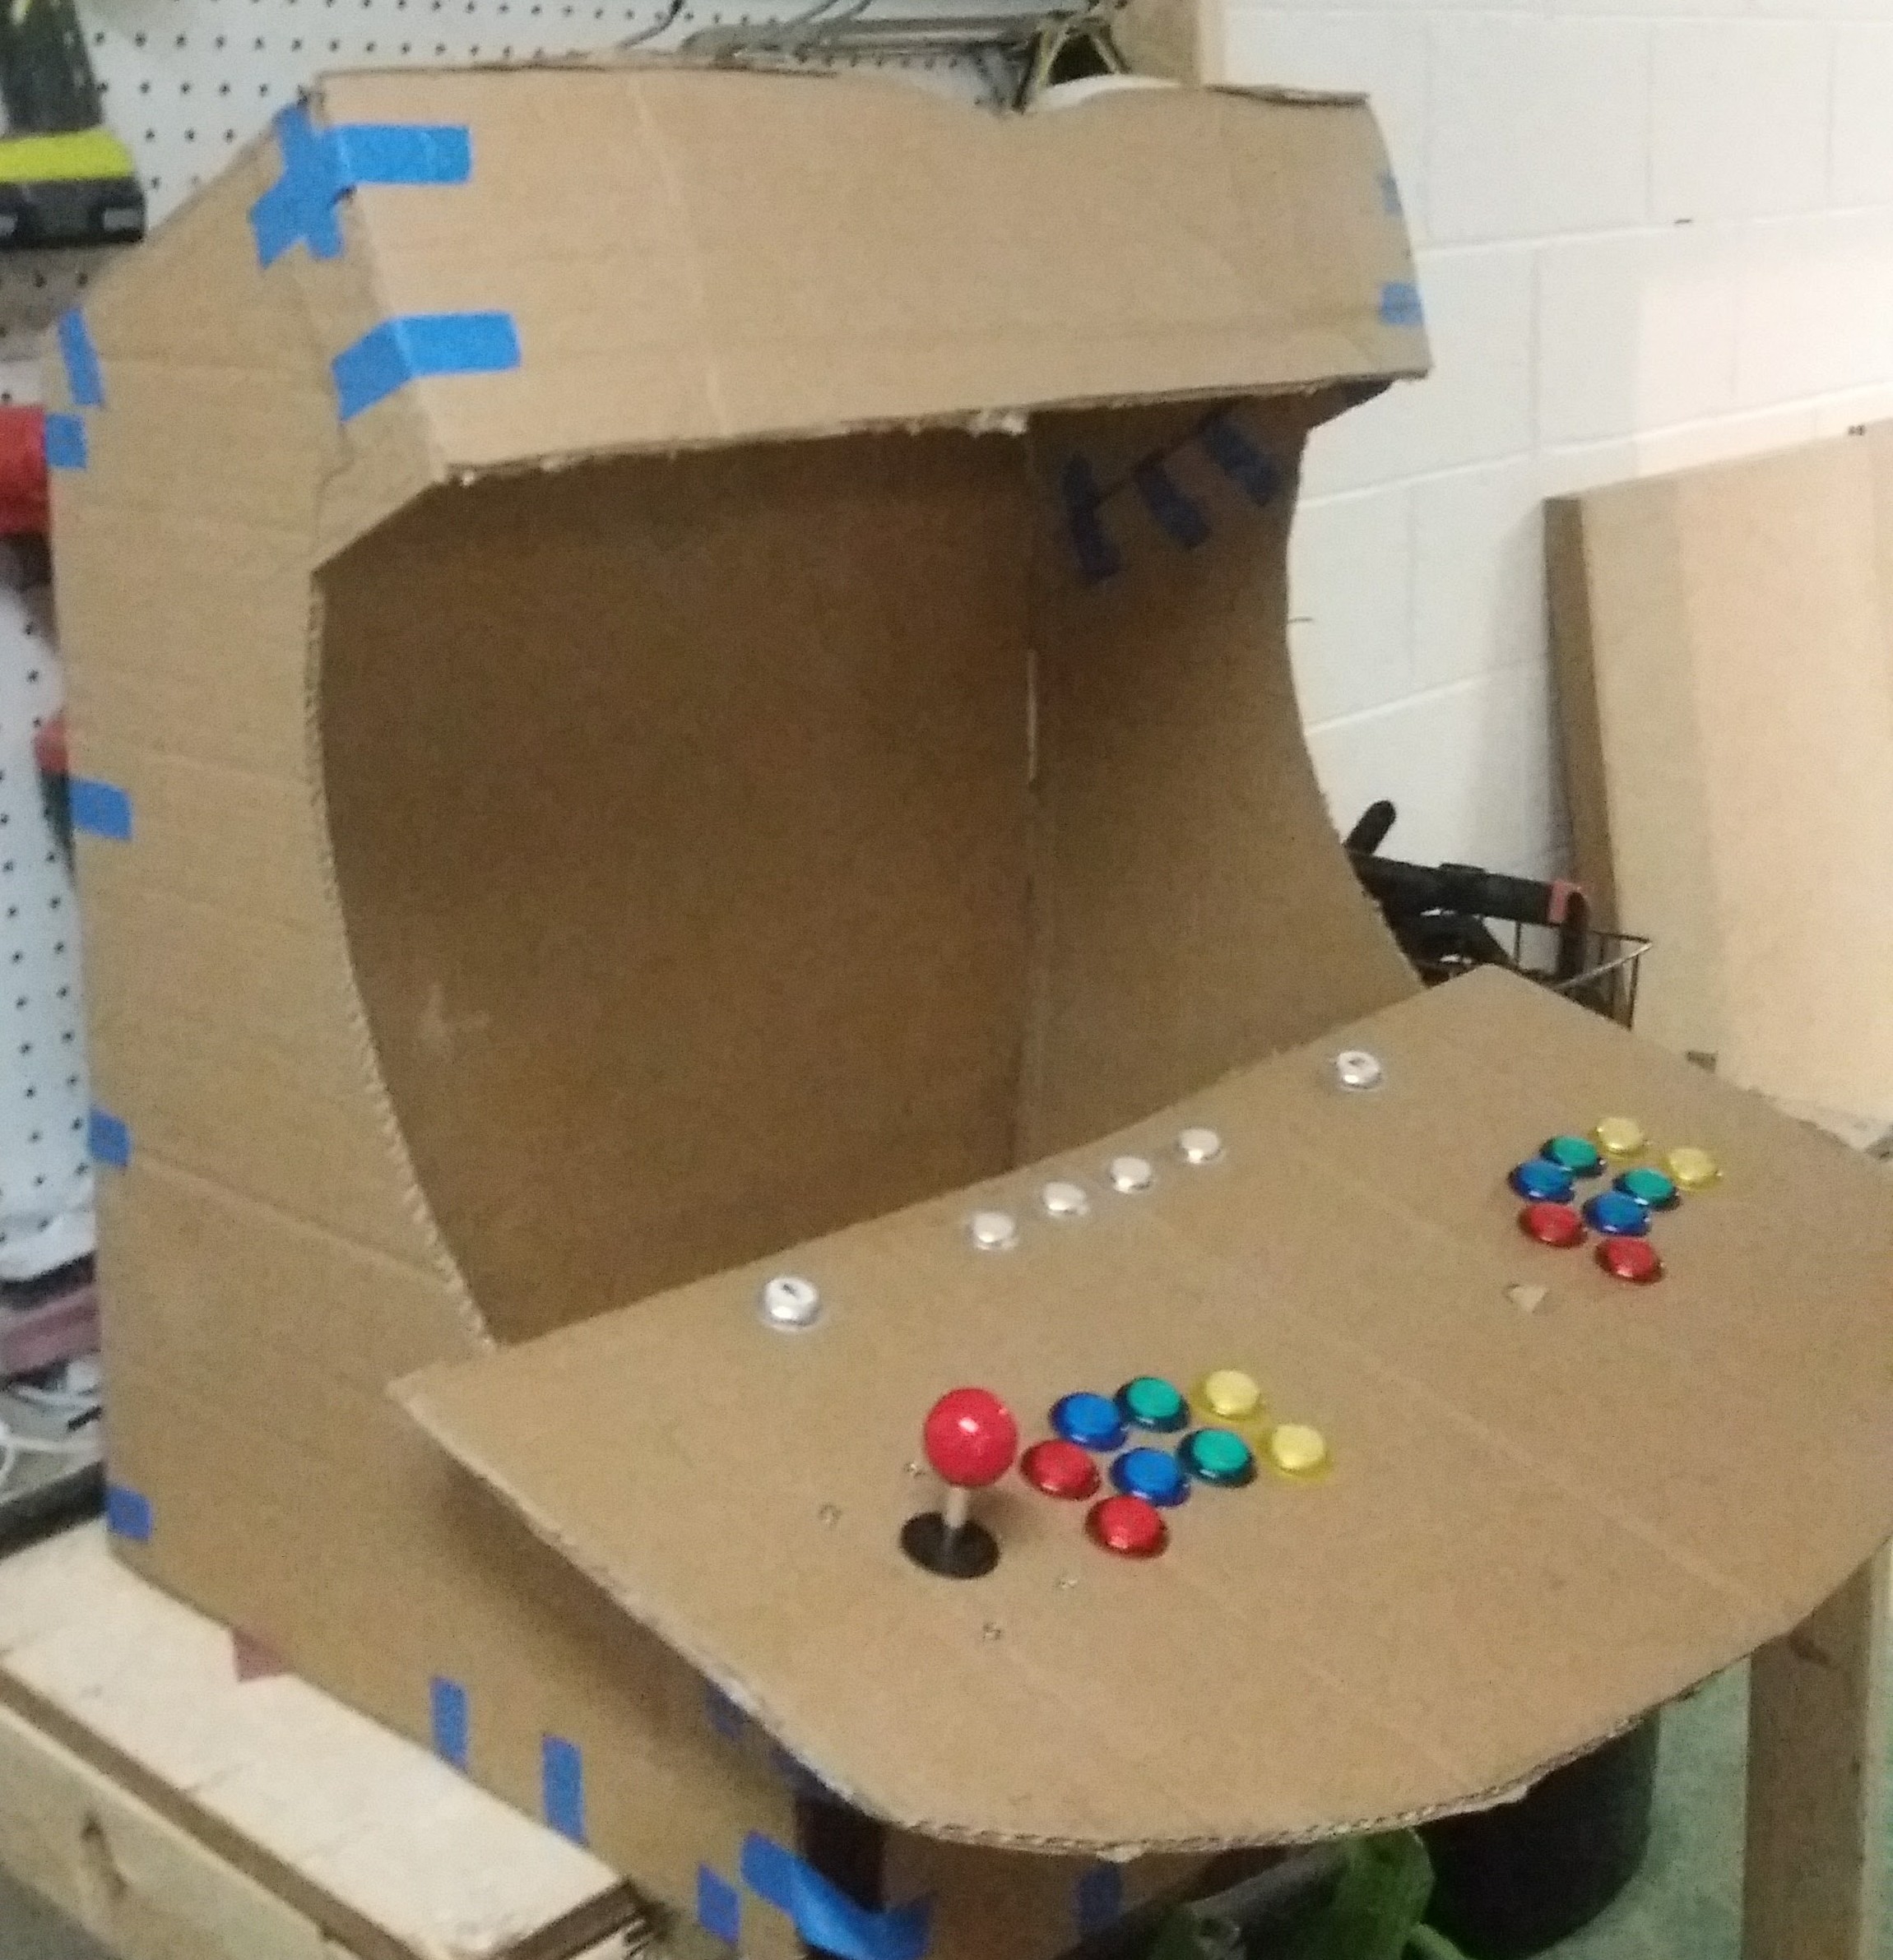


You can see on the first photo that the bottom part of the side of the cabinet doesn’t extend far enough out to support such a large control panel. So I knew I’d have to customize the sides. You can also see where I traced the blueprint for the marquee area on the side, and how I extended it out further to accommodate my speakers and lights.